In this menu you can find or create a list for passing traps to monitoring process. Traps allow to monitor devices which cannot be retrieved via SNMP. The monitored device sends traps to the SONARPLEX appliance to report certain results. Trap Filters are used for determining if traps received by SONARPLEX will be passed to monitoring process or blocked otherwise.
Filters are defined by human readable name, source address, Object Identifier (OID) and resulting service state.
Setting up trap based services should be done by following three steps:
- Setting ap trap sender and receiver
- Defining filters
- Defining trap based services
Step1: Setting up trap sender and receiver
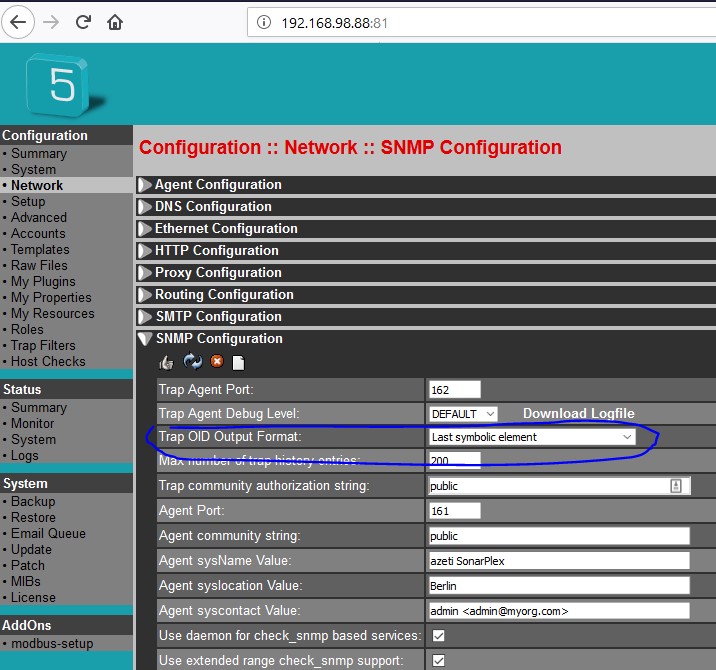
Trap sender are devices, which need to be configured in order to send their traps to SONARPLEX device. The configuration is depending on appropriate device software delivered by provider. SONARPLEX needs to be configured as trap receiver, which can be done by HTTP Admin GUI dialog Configuration::Network::SNMP Configuration:
Most important topic is Trap OID Output Format, which determines trap format and content saved by SONARPLEX. If you change this format, same traps received from some device will look different. If you change tis value, you need to push restart button afterwards in order to apply changes to trap daemon.
Step2: Defining Filters
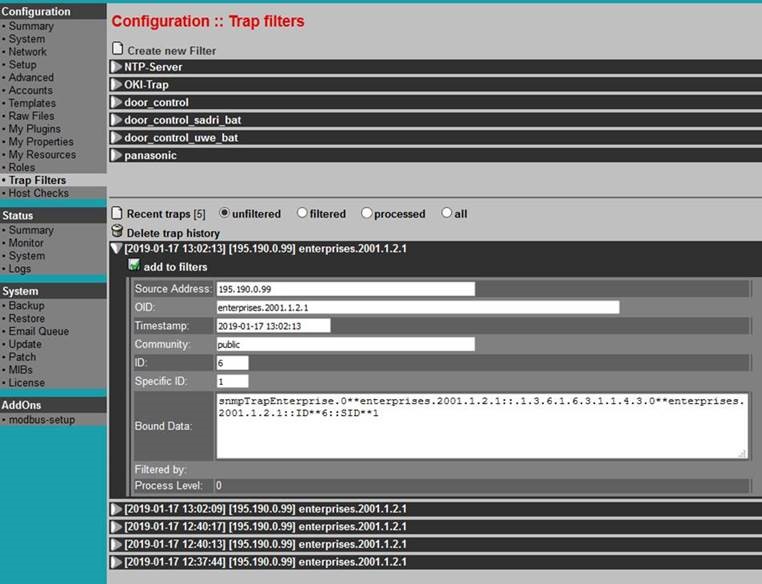
Before defining any filter, be sure that Trap format (Step 1) is defined accordingly and SONARPLEX is receiving traps and saving them by desired format. You can watch raw format and content of traps received by SONARPLEX using configuration option Configuration::Trap filters:
Without having defined filters, traps are just received by SONARPLEX, but not passed to monitoring system. This is the ideal situation where you can start define filters. Analyze received traps and decide, which traps your are interested in and which traps should be ignored. In other words, which traps are worth to be used as base for problem notification (turning service into WARNING/CRITICAL state) and, if possible, which traps are indicating that problem has be gone and can be used for recover notification (turning service back to OK state).
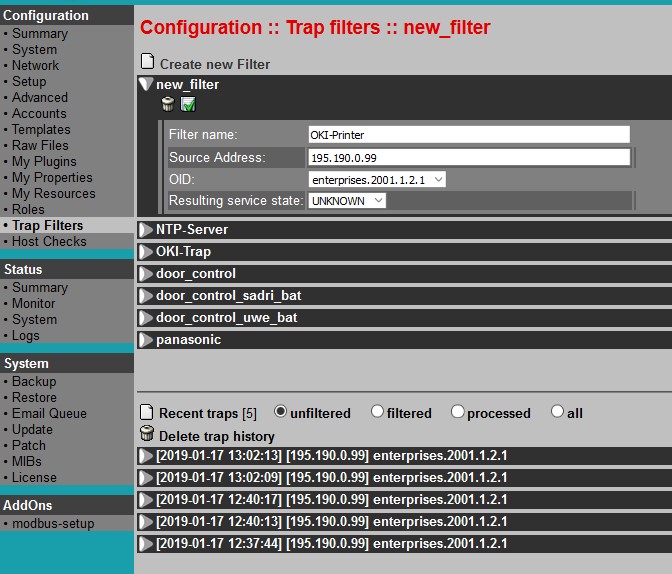
If you found a trap matching the condition above, use button add to filters in order to define a Filter:
Note: If you know, that appropriate trap is always an indication of a problem, you can determine service resulting state right by filter, setting Resulting service state to WARNING or CRITICAL. In many cases, devices are using same OID for traps with different severity. In this case the actual severity of a trap can be determined by its content (Bound data), and Resulting service state should be set to UNKNOWN, meaning the appropriate service will finally determine it’s state by checking bound data.
Step3: Defining trap based services
Ones you have defined at least one trap filter, trap receiver will use them in order to decide, if a trap is worth to be passed to appropriate service for further analyze. In sample above we are interested in traps coming from device 195.190.0.99, which is a OKI printer device. This one has to be defined as a host within SONARPLEX configuration. Now we can bind services based on plugin check_azeti_trap_hostbound to this host. By Analyzing trap history we found out, that if bound data are containing string SID**1, printer is in state OK, SID**2 and SID**5 are indicating different problems. Therefore service definition looks like this:
To edit or create a new or existing trap filter, proceed as follows:
- Open the Administration Web Interface > Configuration > Trap Filters and select "Create new Filter" or an existing one (see picture below).
Enter your settings or changes, as described in the table below.
Parameter
Description
Filter name
Filter name to be used as filter ID
The name must be unique. Allowed characters are a-z, A-Z, 0-9 and underscore (_).
Source address
Address of host sending the trap (empty address means that any source address is allowed to pass appropriate trap).
OID
OID of the trap. If specified OID matches OID of appropriate trap or any of its bound data OIDs, the trap will be passed to the monitoring process.
Resulting service state
Service state created by determining passive check result for service matching trap parameters.
Following values are allowed: “OK”, “WARNING”, “CRITICAL”, “UNKOWN”.
There are two different options to determine service state: The filter option above and service definition. By default the filter option is used. This which may be changed by service definition afterwards during trap processing.
You can see at the bottom the list of traps, which are recently received. The list can be toggled between by process level trap properties unfiltered, filtered, processed and all traps.
Property | Description |
|---|---|
unfiltered | No appropriate filter found, trap has not been passed to monitor process. |
filtered | Filter found, trap has been passed to monitor process. |
processed | Filter found, trap has been passed to monitor process and used for service check result determination. |
all | All traps recently received. |
If no filters are defined, all traps are passed to monitoring process. Trap history size is limited by SNMP Configuration, setting Max number of trap history entries.


