Introduction
This document describes our Door Access Control (DAC) solution using the Site Controller. The DAC is created as a solution to the need of controlling physical access to a facility. In a typical scenario, an operator needs to access the facility, perform installation, configuration and maintenance routines, and leave the facility locked to avoid intrusion. The system must also include the possibility of intrusion detection, as well as the so-called "dead man button" also often referred to as "lone worker button", that is a legal requirement introduced in many countries for operation of machinery or facilities that may cause injuries or death. The following guide will go through the complete installation and parametrization procedure of the DAC functionality in Site Controller.
Access control is a sensitive topic. Here we describe a basic solution, that will have to be modified in most cases. Please check thoroughly after you have finished your installation that you can navigate through all the configured status and that the outcome is the expected. Check also that you receive the current values in the cloud for the sensors that you need to monitor from your NOC. In case you need any help please contact support@azeti.net.
Requirements for the installation:
This list of requirements may be changed if you want to use other hardware than the one referred here. Please contact support@azeti.com if you want to use different hardware technology in your DAC and need support adjusting the Automation Controller rules for the solution.
- A Site Controller with the Automation Controller module active.
- A M2M Control WTSC485 Wiegand RS485 converter, connected to one of the Modbus serial ports of the Site Controller host.
- a HID ProxPro Proximity Reader (Keypad) Model 5335ABK10 (the second letter “B” tells the color beige, so this isn’t crucial), the last two digits are important as “10” states that it is configured to read 6 digits + parity in one single Wiegand packet (Configuration Setting options variant AGK10 – "Buffer 6 keys and add parity").
- ADAM 4150 with Modbus RTU interface, used to connect and control the digital inputs and outputs of the system.
- Input sensors: button, motion sensor (we will simulate it with a switch)
- Outputs: siren/buzzer, LEDs.
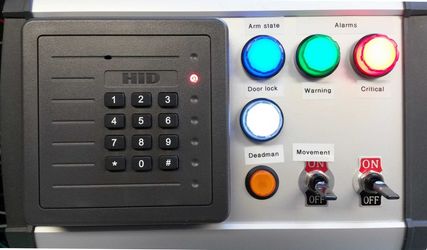
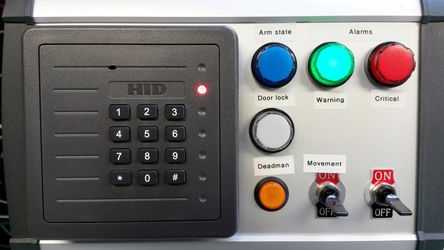
For the remainder of this document we will use a console that includes the necessary outputs and inputs and labels to illustrate how the system works. In the following image, you can see the keypad, an arming status, two alarms to indicate the severity of the alarm status, a dead man button and a switch for simulating the motion sensor.
Basic definitions:
- System arm status: Indicates whether the system is armed or disarmed. A disarmed system will direct the motion sensors and the door contacts to the lone worker feature while an armed system will raise an alarm as soon as a door contact is open or a motion is detected within the facility, as this is interpreted as an intrusion.
- Dead-man alerts and button: if an operator is working in a facility, there are a lot of dangers that can affect his health and even his life. Therefore, the authorities of many countries have introduced by law the need of a mechanism that identifies that the operator is alive. This is normally detected by movements inside the facility while it is disarmed. If there is no movement in some predefined time, an alarm (warning status) will be fired (switching on a buzzer or a siren) and the operator has some time to push the "dead man button", indicating that he is well. If the operator does not react in time, the alarm is escalated (critical status) and the NOC must send someone to investigate the facility in order to check that the operator is okay.
- Door lock: we use a locking mechanism that is activated through a relay. If we activate the relay, the door lock opens and the facility can be accessed. When the relay is not activated, the door is locked.
- Door contact: this is the sensor that we use to detect if the door is open or not. Ideally, a facility has one of these sensors at each and every door and window that can give access to the facility, in order to detect any unauthorized access.
- Correct code: a code is considered correct in case there is an authorized contact that has access enabled to the facility at the time the code is entered.
- Time periods: periods of time that can be configured in order that an operator has access to a facility just during a selected time frame.
Flow diagram
The diagram on the left illustrates how the current solution works, and how the status of the system depends of the inputs and outputs. In the initial state, the site/facility is armed, and no alarm is raised. After a successful entry of a valid key code, the site will switch to an disarmed status with no active alarms. The timers T1 and T2 will start to count time to the warning and critical thresholds respectively. The timers will be restarted every time a motion is detected or the dead man button is pressed, resetting the system to the disarmed/no alarms status. If the warning time threshold is exceeded by timer T1 without any motion detected or a push to the dead man button in the meantime, the site will continue disarmed, but will change its alarm to a Warning state, and wait for timer T2 for the escalation. It is advisable to configure some kind of signal, like a siren or a LED to indicate to the operator that the system is in that warning state and he should press the dead man button or do some moves to trigger the motion detector. Again, if before T2 is reached a motion is detected or the dead man button is pressed, the system will return to the disarmed/no Alarms state. However, if the T2 timer is exceeded the system will change its status to CRITICAL. It is advisable to establish a protocol on the system in order that the NOC sends someone to check out the facility if the operator is still present and fine. The alarm states again will return to disarmed/no Alarms state if again a motion is detected or the button pressed (in case the worker was just taking a bit longer to reach the button than expected). Please note this is just a generic installation. The flexibility of the Automation Controller allows your company to adjust the rules regarding this configuration and add any feature that might be required. The brute force attack detection works as follows: If the system is in initial state and receives three times an invalid code, it will block the keypad and signal it with an orange light on the keypad and an CRITICAL alarm send to the NOC. After some defined time, the system will return to the initial status again. |
|---|
How it works
The following table shows pictures that illustrate the different status of the flow diagram and show the different status of the outputs of the system.
The description follows the workflow of the system after being installed without modifying parameters. Some parameters must be changed in the production environment, like the timers for the warning and critical alarms.
| Demo console | Description |
|---|---|
This is the initial (resting) status of the system. The site is armed and there is no alarm. The door lock is closed (and locked). At this point, any movement detected in the facility or a change of the door contact sensor state will cause an immediate alarm. To restore the system to this initial status from any of the other states below (except from the brute force attack detected one), the site must be armed by using the keypad and entering any invalid key, or the NOC can send an action remotely to switch back into armed state. | |
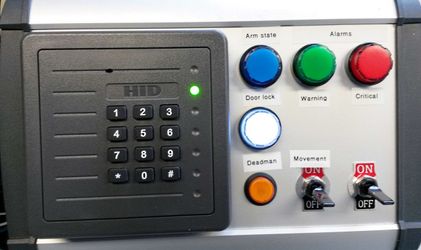
| After a correct code is entered, the system signals it with a short beep and a green light in the keypad. The door lock is opened for 5 seconds (signaled by switching on the white led), in order that the operator can enter the facility. After that time, the light of the keypad returns to red and the door locks again (signaled by the white led switching off). | |
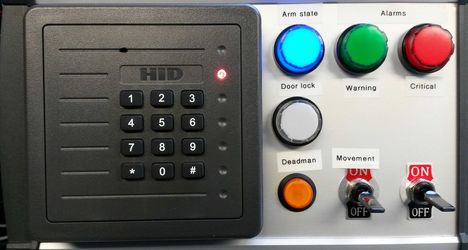
| In this status the system is disarmed. The system will continue in this status while it detects movement. If no motion is detected (in this console we simulate movement with the switch labeled "Movement", normally you would connect a PIR to a digital input instead) during the time established for the timer T1, the system will raise an alarm. | |
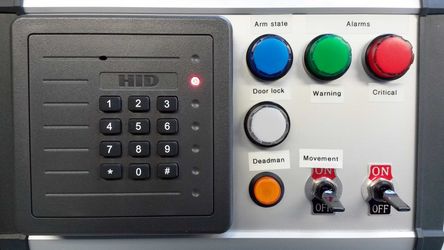
| In this status, the system has an alarm because no motion was detected during T1 timer. A siren (in this case a small but annoying buzzer so it's not activated per default in this example setup) can be activated and the warning LED will light up to signal the operator that he needs to indicate that he is still okay by pressing the dead man button. | |
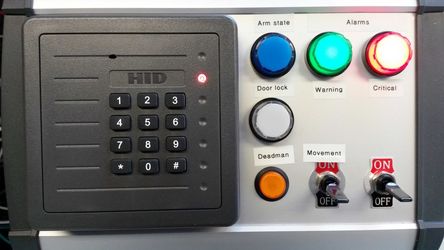
| If there is no signal before the timer T2 finishes, the system will start the critical alarm by lighting up the Critical LED, too. Even in this state the system can be reset to disarmed state with no active alarms by again the operator moving in front of a motion detector or by pressing the dead man button. | |
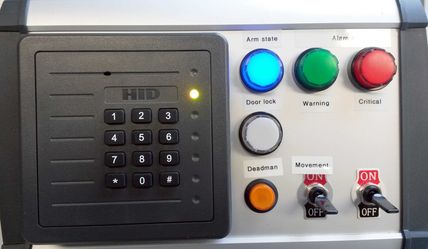
| The brute force attack is signaled with an orange LED. When the system receives a number of wrong codes, it will block the keypad for some time and set the keypad LED to orange to indicate that it is disabled. Please note that not all keypads are configured to use this color code. If you have any doubt, please review your installation manual for the keypad in order to enable the orange LED. |
Brute force attack
The door has a brute force attack protection. If the system receives more than 3 wrong codes without a correct one in between it will deactivate the keypad input for some time. Both, the number of invalid codes to be entered and the time delay until the keypad becomes responsive again after a brute force attempt was detected can be configured. The virtual sensor configuration parameters brute_force_count and blocking_time (in minutes) are used for that and you can see how to set them in the Sensors configuration of the sensor Access_Control_Door1 below.
Keypad alive rule
The model of keypads that we are using allow to setup a "keep alive" signal, meaning that every minute they will send a "I´m alive" signal to the WTSC controller. In case you have this signal configured, you can catch it with a rule and configure the watchdog to listen to those messages to indicate to the NOC should such a keypad stop working for some reason.
Configuration code
The door access control solution consists of a series of sensors and actuators, that together with the AC rules will produce the desired results. We outline here the code of a basic configuration, that can be implemented through templates using our cloud solution.
Sensors configuration.
The following code shows the sensors that are configured to implement the solution. Please refer to the Site Controller configuration file internals document if you have any doubt about the syntax used in this file.
The following table provides a list of the sensors, their function inside the solution and their expected values. For some sensors, you can use the value that they provide or the event.
| Sensor | Input/Output | Function | Expected Calibrated results/events | Explanation |
|---|---|---|---|---|
Door1_Status | Input | This is a digital sensor that indicates if the door of the facility is open or closed. Typically will be a dry contact sensor that will be installed in every possible access to the facility (doors and windows). | Events:
| Self explanatory |
| Dead-man-Button | Input | This is a digital sensor that has to be pressed by the operators to indicate that everything is alright in case their movement is not detected inside the facility. | Event:
| Self explanatory |
| Door1_Motion_Detector | Input | This is the PIR that senses a motion in the facility. In our scenario, we simulate it with a switch (see console picture). If you put the switch in the ON position, it will consider that there is movement. Do not forget to put it down to the OFF (no movement) when you are finished with the simulation. | Events:
| Self explanatory |
| WTSC_Keypad_Door_PIN_1 | Input | This sensor gathers the 6 digits pin code from the device. Do not be confused by the fact that the code is received in 4 keys, as the pin is codified inside with some extra information. | Used by the Door Controller to give access. Uses a virtual sensor (VS_access_control) to see if the pin is allowed for the door in this time frame. | |
| WTSC_Keypad_Door_PIN_2 | Input | Works the same as WTSC_Keypad_Door_PIN_1 | Allows to control a door look from the other side of the door via a second keypad, too. In our simple example here, we do not take advantage of that second keypad option. | |
| Access_Control_Door1 | Output | This is the outcome of the access attempt. | Calibrated results:
| Access allowed. Access denied. Heartbeat from the keypad. |
WTSC_Keypad_DO_1_red_LED WTSC_Keypad_DO_2_green_LED WTSC_Keypad_DO_3_Buzzer | Output | This are the visual and acoustic signals in the keypad, consisting in a small LED in the upper/right corner and an internal buzzer. | Events: ON/OFF | Self explanatory |
| WTSC_Keypad_Relay | Output | This is the relay output that is used to control the lock. It will be activated for 5 seconds in order to open the lock. | Events: ON/OFF | Self explanatory |
Devices configuration
Actions configuration
There are a few actions needed in the solution. The following code shows the actions configuration for the basic environment. Further actions can be configured depending on your installation needs. In case you have any doubt about actions configuration, check the configuration manual.
The following table provides a list of the actions and a small description of their function inside the solution. Most actions described here are Modbus write commands, intended to change the value of some register in a Modbus device for controlling a LED or relay. There is also one action for arming/disarming the site from the cloud.
| Action name | Function |
|---|---|
Switch_M2M_WTSC_DO_2_green_LED Switch_M2M_WTSC_DO_1_red_LED Switch_M2M_WTSC_orange_LED | These are the actions that take care of the LEDs in the keypad, changing the color according to the corresponding status. LEDs are connected to the WTSC interface and are switched ON and OFF by setting a register in the device. |
Switch_M2M_WTSC_DO_3_Buzzer Switch_M2M_WTSC_DO_3_Beep_short | These actions control the buzzer inside the keypad. The first action switches it ON and OFF, while the second one makes a simple short beep of a determined duration. |
Switch_M2M_WTSC_default | This action sends the WTSC a signal to return to default values for all its outputs. |
Switch_M2M_WTSC_Relay_WHITE | This action activates and deactivates the Relay output in the WTSC interface. In our environment, it will activate the door lock to open the facility. |
Switch_ARM_LED_0_BLUE | This action is configured to change output 0 in the ADAM 4150, which is connected to the blue LED in the console. |
Switch_Deadman_warn_LED_1_GREEN Switch_Deadman_alert_LED_2_RED | These actions are configured to change outputs 1 and 2 in the ADAM 4150, which are connected to the green and red LED in the console, respectively. |
Switch_Break_in_LED_2_RED | This action is configured to change output 2 in the ADAM 4150, which is connected to the red LED. |
Automation Controller rules for the door control
The following sections show the code and descriptions for the rules that configure the door control, and make references to the sensors and actions configured in the previous section. Please refer to the Automation Controller: description and configuration guide if you have any doubt about the syntax used in this file.
DISCLAIMER
Check thoroughly the rules that are deployed with your version of Site Controller. Pay special attention to the dead man control and the break in. It is your responsibility to verify that the rules are configured according to your company regulations and local laws. Our support system will be glad of helping you redefine the rules if necessary.
Rule: ClearOutputs
This rule fires when there is a change in the virtual sensor called "ClearOutputs", which will have a Boolean value. If the value is true, it will send actions to switch off the indicator LEDs of the console, and set the virtual Boolean sensor that indicates a break in in the facility to false. It also changes the status of the virtual sensor "ClearOutputs" to have the value false, in order to be prepared for the next cleanup.
    <rule rule_id="ClearOutputs">
      <triggers>
        <trigger sensor_id="ClearOutputs" trigger_topic="calibrated_result"
          value_name="to_clear" value_type="boolean" />
      </triggers>
      <conditions>
        <condition expr="to_clear==True">
          <true>
            <action_list>
              <action action_id="Switch_ARM_LED_0_BLUE" command="OFF" />
              <action action_id="Switch_Deadman_warn_LED_1_GREEN" command="OFF" />
              <action action_id="Switch_Deadman_alert_LED_2_RED" command="OFF" />
            </action_list>
            <result_list>
              <result result_value="False" sensor_id="VS_deadman_warn"
                  value_type="boolean" />
              <result result_value="False" sensor_id="VS_deadman_alert"
                  value_type="boolean" />
              <result result_value="False" sensor_id="VS_Brute_Force_Alert"
                  value_type="boolean" />
            </result_list>
            <state_list>
              <state state_name="to_clear" state_value="False" />
            </state_list>
          </true>
        </condition>
      </conditions>
    </rule>
Rule: door1control
This rule controls the behavior of the door lock, the LEDs in the keypad and the buzzer of the keypad when there is a change in the access status of the door.
This rule fires when there is a change in the virtual sensor Access_Control_Door1. There are several conditions depending of the status of the sensor.
- When the access value is granted, it will activate the relay to open the door, and sets the LEDs in the keypad to the color green.
- When the access value is denied, it will deactivate the relay to open the door, indicate a wrong code with a short beep and set the LEDs in the keypad to the color red.
- When the access value is idle, meaning that the keypad comes back to idle status after 5 seconds of receiving an input, it will switch off the door relay and the buzzer, and set the LEDs in the keypad to the color red.
- When the access value is brute force attack, it will make a short beep, switch off the door relay, and set the LEDs in the keypad to the color orange.
    <rule rule_id="door1control">
      <triggers>
        <trigger sensor_id="Access_Control_Door1"
          trigger_topic="calibrated_result" value_name="access" value_type="string" />
      </triggers>
      <conditions>
        <condition expr="access == 'granted'">
          <true>
            <action_list>
              <action action_id="Switch_M2M_WTSC_Relay_WHITE" command="ON" />
              <action action_id="Switch_M2M_WTSC_DO_1_red_LED" command="OFF" />
              <action
                  action_id="Switch_M2M_WTSC_DO_2_green_LED" command="ON" />
            </action_list>
          </true>
        </condition>
        <condition expr="access == 'denied'">
          <true>
            <action_list>
              <action action_id="Switch_M2M_WTSC_Relay_WHITE" command="OFF" />
              <action
                  action_id="Switch_M2M_WTSC_DO_3_Beep_short" command="ON" />
              <action
                  action_id="Switch_M2M_WTSC_DO_2_green_LED" command="OFF" />
              <action action_id="Switch_M2M_WTSC_DO_1_red_LED" command="ON" />
            </action_list>
          </true>
        </condition>
        <condition expr="access == 'idle'">
          <true>
            <action_list>
              <action action_id="Switch_M2M_WTSC_Relay_WHITE" command="OFF" />
              <action action_id="Switch_M2M_WTSC_DO_3_Buzzer" command="OFF" />
              <action
                  action_id="Switch_M2M_WTSC_DO_2_green_LED" command="OFF" />
              <action action_id="Switch_M2M_WTSC_DO_1_red_LED" command="ON" />
            </action_list>
          </true>
        </condition>
        <condition expr="access == 'brute_force_attack'">
          <true>
            <action_list>
              <action action_id="Switch_M2M_WTSC_Relay_WHITE" command="OFF" />
              <action
                  action_id="Switch_M2M_WTSC_DO_3_Beep_short" command="ON" />
              <action action_id="Switch_M2M_WTSC_orange_LED" command="ON" />
            </action_list>
          </true>
        </condition>
      </conditions>
    </rule>
Rule: ArmState
This rule controls the output of the virtual sensor BTS_arm_state and signal its status in the blue LED of the console using the action Switch_ARM_LED_0 .
The rule fires whenever there is a change in the sensor Access_Control_Door1 or in the virtual sensor BTS_arm_state.
- When the access value is denied and if the site is not already armed, the rule will change the value of the BTS_arm_state sensor to armed.
- When the access value is granted and the site is not already disarmed, the rule will change the value of the BTS_arm_state sensor to disarmed and will change the value of the ClearOutputs sensor in order to trigger the ClearOutputs rule.
- When the BTS_arm_state sensor value is armed, the rule will turn the Switch_ARM_LED_0 ON, and OFF in case of the value is disarmed.
    <rule rule_id="ArmState">
      <triggers>
        <trigger sensor_id="Access_Control_Door1"
            trigger_topic="calibrated_result" value_name="access"
            value_type="string" />
        <trigger sensor_id="BTS_arm_state"
            trigger_topic="calibrated_result" value_name="arm_state"
            value_type="string" />
      </triggers>
      <conditions>
        <condition expr="access == 'denied' and (arm_state == 'DISARMED' or arm_state == None)">
          <true>
            <result_list>
              <result result_value="ARMED"
                  sensor_id="BTS_arm_state" value_type="string" />
            </result_list>
          </true>
        </condition>
        <condition expr="access == 'granted'  and (arm_state == 'ARMED' or arm_state == None)">
          <true>
            <result_list>
              <result result_value="True"
                  sensor_id="ClearOutputs" value_type="boolean" />
              <result result_value="DISARMED"
                  sensor_id="BTS_arm_state" value_type="string" />
              <result result_value="False"
                  sensor_id="VS_break_in" value_type="boolean" />
            </result_list>
          </true>
        </condition>
        <condition expr="arm_state == 'ARMED'">
          <true>
            <action_list>
              <action action_id="Switch_ARM_LED_0_BLUE" command="ON" />
            </action_list>
          </true>
          <false>
            <action_list>
              <action action_id="Switch_ARM_LED_0_BLUE" command="OFF" />
            </action_list>
          </false>
        </condition>
      </conditions>
    </rule>
Rule: BreakIn
This rule identifies when there has been an unauthorized access to the facility, meaning that the door was opened or there was a movement inside while the facility was armed.
The rule fires whenever there is a change in sensors Door1_Motion_Detector, Door1_Status, Deadman-Button or the virtual sensor BTS_arm_state.
When the site is armed and the door opens, there is any movement in the facility or should a burglar be so kind to push the dead man button, the rule changes the status of the red LED on the console to ON using the action switch Switch_Break_in_LED_2_RED to ON. It also sets the VS_break_in virtual sensor to True in order that it is signaled in the NOC that there is an alarm.
You may consider to add an action to switch on a loud alarm that can alert a neighbor to call for the authorities, too, in case some break in is detected.
    <rule rule_id="BreakIn">
      <triggers>
        <trigger sensor_id="Door1_Motion_Detector" trigger_topic="events"
            value_name="motion" value_type="string" />
        <trigger sensor_id="Deadman-Button" trigger_topic="events"
            value_name="deadman_button" value_type="string" />
        <trigger sensor_id="Door1_Status" trigger_topic="events"
            value_name="door_open" value_type="string" />
        <trigger sensor_id="BTS_arm_state" trigger_topic="calibrated_result"
            value_name="arm_state" value_type="string" />
      </triggers>
      <conditions>
        <condition expr="arm_state == 'ARMED' and (door_open=='Door1_Opened' or motion=='Motion detected' or deadman_button=='Button pressed')">
          <true>
            <action_list>
              <action action_id="Switch_Break_in_LED_2_RED" command="ON" />
            </action_list>
            <result_list>
              <result result_value="True"
                  sensor_id="VS_break_in" value_type="boolean" />
            </result_list>
          </true>
        </condition>
      </conditions>
    </rule>
Rule: DeadManControl
This rule is in charge of the security measure of the so-called Dead man button, that fires an alarm in case the facility has been open for some time without any detected movement, as it can be due to an accident with the operator.
The rule fires with the changes in the sensor Deadman-Button, which is a physical button located in the facility (orange button on the console), the movement detection (done with a switch in our console that changes the sensor Door1_Motion_Detector), and the virtual sensor BTS_arm_state.
- When the BTS_arm_state changes to disarmed, the rule starts two timers, that will switch the LEDs for the warning and critical status of the dead man alert. If the timers reach the configured time, the actions will be fired.
- When the BTS_arm_state is disarmed and there is a motion or the pressing of the dead man button detected, the timers mentioned in the former point are deleted and the actions will not fire.
- When the BTS_arm_state is armed, the timers will be deleted and therefore the actions with the alerts will not be fired.
    <rule rule_id="DeadManControl">
      <triggers>
        <trigger sensor_id="Deadman-Button" trigger_topic="events"
            value_name="deadman_button" value_type="string" />
        <trigger sensor_id="Door1_Motion_Detector" trigger_topic="events"
            value_name="motion" value_type="string" />
        <trigger sensor_id="BTS_arm_state" trigger_topic="calibrated_result"
            value_name="arm_state" value_type="string" />
      </triggers>
      <timers>
        <timer delay="10" timer_id="T1" />
        <timer delay="20" timer_id="T2" />
        <timer delay="10" timer_id="T3" />
        <timer delay="20" timer_id="T4" />
      </timers>
      <conditions>
        <condition expr="arm_state == 'DISARMED'">
          <true>
            <action_list>
              <action action_id="Switch_Deadman_warn_LED_1_GREEN"
                  command="ON" timer="T1" />
              <action action_id="Switch_Deadman_alert_LED_2_RED"
                  command="ON" timer="T2" />
            </action_list>
            <result_list>
              <result result_value="True" sensor_id="VS_deadman_warn"
                  timer="T3" value_type="boolean" />
              <result result_value="True" sensor_id="VS_deadman_alert"
                  timer="T4" value_type="boolean" />
            </result_list>
          </true>
        </condition>
        <condition expr="arm_state == 'DISARMED' and (deadman_button=='Button pressed' or motion=='Motion detected')">
          <true>
            <action_list>
              <action action_id="Switch_Deadman_warn_LED_1_GREEN" command="OFF" />
              <action action_id="Switch_Deadman_alert_LED_2_RED" command="OFF" />
            </action_list>
            <result_list>
              <result result_value="False"
                  sensor_id="VS_deadman_alert" value_type="boolean" />
              <result result_value="False"
                  sensor_id="VS_deadman_warn" value_type="boolean" />
            </result_list>
            <kill_timers>
              <timer_id>T1</timer_id>
              <timer_id>T2</timer_id>
              <timer_id>T3</timer_id>
              <timer_id>T4</timer_id>
            </kill_timers>
          </true>
        </condition>
        <condition expr="arm_state == 'ARMED'">
          <true>
            <kill_timers>
              <timer_id>T1</timer_id>
              <timer_id>T2</timer_id>
              <timer_id>T3</timer_id>
              <timer_id>T4</timer_id>
            </kill_timers>
          </true>
        </condition>
      </conditions>
    </rule>
Rule: Brute_Force_Detection
This is just a simple rule that makes sure if the access_control module is detecting a brute force attempt, the corresponding alert state is forwarded to the sensor used to inform the NOC about it.
    <rule rule_id="Brute_Force_Detection">
      <triggers>
        <trigger sensor_id="Access_Control_Door1"
            trigger_topic="calibrated_result" value_name="access"
            value_type="string" />
      </triggers>
      <conditions>
        <condition expr="access == 'brute_force_attack'">
          <true>
            <result_list>
              <result result_value="True" sensor_id="VS_Brute_Force_Alert"
                  value_type="boolean" />
            </result_list>
          </true>
        </condition>
      </conditions>
    </rule>
Interacting with the solution in the Cloud
Arming status, Breakin and Deadman alert
The arming status, the Break In alarm and the dead man alert are shown directly in the cloud as events in the admin&live table.
Lights on the console
The console status are also visible in the admin& live table
Action execution
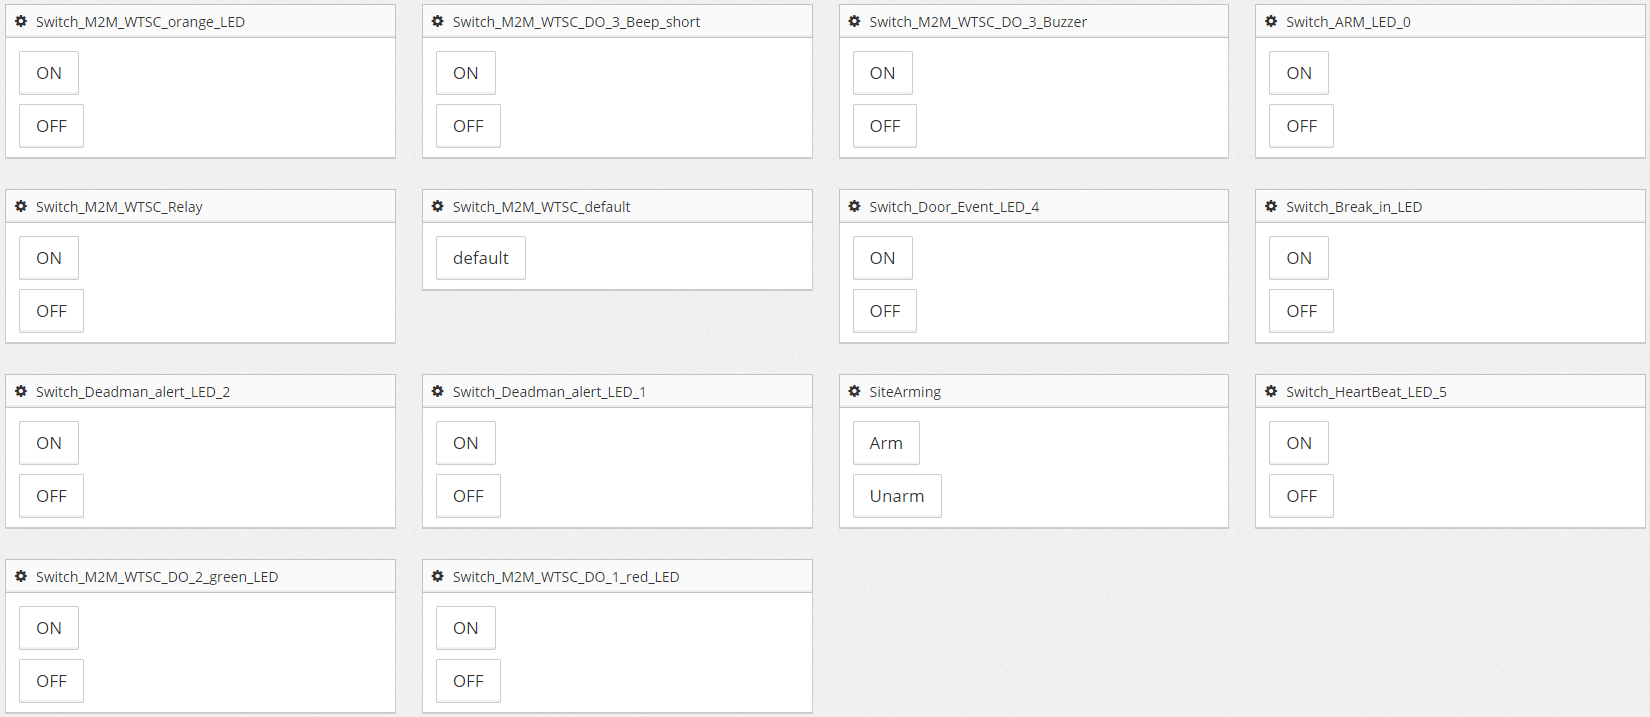
The complete solution is designed in a way that it can be operated directly from the keypad (take into account the facility can be in an area with network disconnections, and you still need that the solution works). For testing pursopes, you can also use actions directly from the cloud to switch LEDs on and off, alarms and arming/disarming the site. See below the actions that are available:
Troubleshooting
- When you are installing the solution for the first time, or if you modify the rules, you should always perform a complete test of all the rules that you have configured and have a look to the log files in order to see if the outcome is the expected. The automation controller rules can be found in
%SCPATH%/log. - In case you modify complex rules that depend on states, it is advisable that you stop and start both Site Controller and Mosquitto daemon, in order that the new rules are not confused by the old status of the system.
- In case the key codes are not working, make sure the keypad is configured to send with the Wiegand protocol (see image below):
If you have doubts while configuring or testing the rules, please contact support@azeti.net
